• Sign Up! To view all forums and unlock additional cool features

    Welcome to the #1 Fiesta ST Forum and Fiesta ST community dedicated to Fiesta ST owners and enthusiasts. Register for an account, it's free and it's easy, so don't hesitate to join the Fiesta ST Forum today!


Boost Gauge

Sekred

1000 Post Club
Messages
1,395
Likes
402
Location
Mid North Coast
#1
Installed a boost gauge the other day.
I was not sure where to put. I would of like it on the side pillar or on the dash but really loath to drill holes in things and glue/stick gauge pods to the dash area. In the end, I installed it in the centre console.

Boost Gauge 2.jpg


OP
Sekred

Sekred

1000 Post Club
Messages
1,395
Likes
402
Location
Mid North Coast
Thread Starter #4
Very cool um, so when looking at the boost gauge while driving...
Yes, that was a consideration. Looking down while driving is not ideal.
To counteract that problem to some degree, I have mounted the gauge on a angle so at WOT and max boost (around 21 psi) the gauge needle is vertical requiring just a quick glance down.


MKVIIST

5000 Post Club
Staff Member
Premium Account
Messages
5,772
Likes
1,035
#5
Can you post a close-up image?

I was thinking about eventually getting a boost gauge as well and was considering putting one on the a-pillar.


MKVIIST

5000 Post Club
Staff Member
Premium Account
Messages
5,772
Likes
1,035
#7
Yeah thanks, man that looks really clean. Were you able to tap into the existing wires to power the gauge or run your own from the battery?


OP
Sekred

Sekred

1000 Post Club
Messages
1,395
Likes
402
Location
Mid North Coast
Thread Starter #8
I have not wired it up yet but my intension is to connect directly to the OEM instrument dimmer control . I just need to have a close look so I can work out how the dimmer switch comes out of the dash.


MKVIIST

5000 Post Club
Staff Member
Premium Account
Messages
5,772
Likes
1,035
#9
Maybe this might help if you decide to tap into the radios wiring:

2011 Ford Fiesta Car Stereo Wiring Diagram

Car Radio Battery Constant 12v+ Wire: Yellow/Red
Car Radio Accessory Switched 12v+ Wire: Brown/White
Car Radio Ground Wire: Black/Blue
Car Radio Illumination Wire: Blue
Car Stereo Dimmer Wire: N/A
Car Stereo Power Antenna Trigger Wire: N/A
Car Stereo Amp Trigger Wire: N/A
Car Stereo Amplifier Location: N/A
Car Audio Front Speakers Size: N/A
Car Audio Front Speakers Location: N/A
Left Front Speaker Positive Wire (+): White
Left Front Speaker Negative Wire (-): White/Brown
Right Front Speaker Positive Wire (+): White/Violet
Right Front Speaker Negative Wire (-): White/Orange
Car Audio Rear Speakers Size: N/A
Car Audio Rear Speakers Location: N/A
Left Rear Speaker Positive Wire (+): White/Green
Left Rear Speaker Negative Wire (-): Brown/Yellow
Right Rear Speaker Positive Wire (+): Brown/White
Right Rear Speaker Negative Wire (-): Brown/Blue
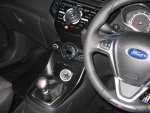
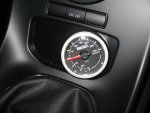
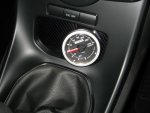
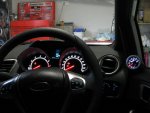
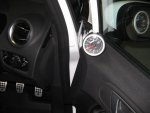
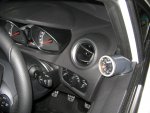


OP
Sekred

Sekred

1000 Post Club
Messages
1,395
Likes
402
Location
Mid North Coast
Thread Starter #10
Thanks MKVIIST, I may need to use that info. Dimmer switch is a no-go. Dash module uses its own electronic control unit, can't just add a gauge. [:(!]


OP
Sekred

Sekred

1000 Post Club
Messages
1,395
Likes
402
Location
Mid North Coast
Thread Starter #11
I change the gauge mounting background because the satin black paint was marking very easily.

Gauge Boost.jpg

This is where I picked up the boost and vacuum signal for the gauge. I tee into the only fitting I could find on the intake manifold just above the throttle body.

Boost line 1.jpg


OP
Sekred

Sekred

1000 Post Club
Messages
1,395
Likes
402
Location
Mid North Coast
Thread Starter #13
Thanks MK, I'm slow but methodical most of the time. Sometimes I lose my patience and stuff things but.


OP
Sekred

Sekred

1000 Post Club
Messages
1,395
Likes
402
Location
Mid North Coast
Thread Starter #14
Well I moved my boost gauge, and broke my rule of not drilling holes in plastic panels.
The job turned out bigger that Ben-Hur towards the end with lots of frustrations. To make matters worst still, I damaged the boost gauge and will have to replace it.

Boost guage-door 1.jpg

Boost gauge door-2.jpg


OP
Sekred

Sekred

1000 Post Club
Messages
1,395
Likes
402
Location
Mid North Coast
Thread Starter #17
How did you mount the gauge to the door panel?
PVC plumbers pipe, 50mm 90 degree elbow. I sanded and painted it. It has another piece cross it plastic attached inside across the bore and bolted to the door panel.

Boost gauge mount.jpg


MKVIIST

5000 Post Club
Staff Member
Premium Account
Messages
5,772
Likes
1,035
#18
That came out really good Sekred, I don't know if I can put a big hole in my door just yet lol.


OP
Sekred

Sekred

1000 Post Club
Messages
1,395
Likes
402
Location
Mid North Coast
Thread Starter #20
That came out really good Sekred, I don't know if I can put a big hole in my door just yet lol.
Thanks, big hole?, 2 holes actually, 1/2 and 1/4. Sometimes I make decisions and just stick with it. The difference in colour is exaggerated by the camera.
The gauge is a heap easier to see when your driving, just a quick glance to the right.


Similar threads


Top