• Sign Up! To view all forums and unlock additional cool features

    Welcome to the #1 Fiesta ST Forum and Fiesta ST community dedicated to Fiesta ST owners and enthusiasts. Register for an account, it's free and it's easy, so don't hesitate to join the Fiesta ST Forum today!


COOLERWORX Pro Short Shifter Installation Tips & Tricks + Linkage Redesign Discussion

M-Sport fan

9000 Post Club
Messages
14,101
Likes
6,755
Location
Princeton, N.J.
I didn't know there was a CAE for our cars. Every review I've seen says these are the standard when it comes to high performance shifters. Anodized black for 1,600 is a lot to swallow but it's definitely on my to do list now.
Yeah, that is definitely a 'full race' piece (even more so than the Coolerworx!), which seems to require doing away with the console altogether, which of course will turn many on here off to it.

But again, given that price, one is about a third of the way cost wise to a Sadev sequential, albeit yes, that option renders the car totally unstreetable, and brings even more 'consumable co$t$' into play with the frequently required rebuilds/refreshes of that gearbox. [:(]


Lays

Member
Messages
403
Likes
352
Location
Salem, OR, USA
I've been wanting one of these for a while, but recently tried my friends in his car. I wasn't a huge fan of how it changes the shift pattern to be a little diagonal vs straight back between each gear, is there a way to fix that?


ihako

New Member
Messages
2
Likes
7
Location
Clarksville, TN, USA
Hey guys,

I was installing my CoolerWorx shifter the other day and ran into a snag. Looks like they redesigned one of the ball/socket connectors and I was wondering the correct way to install it? See the attached picture. The other side just snapped on like in Spark Plug Steve's video..

PXL_20220204_214206189.jpg

I've seen the install of a CoolerWorx shifter on a Focus and they had to cut off the socket connection and install a different connector with set screws. It kind of looks like I might need to cut off this socket connector and attach it directly to the shifter with the set screws?

I reached out to Ron but I think he's still waiting on the new installation instructions from CoolerWorx. I also reached out to CoolerWorx, but from what I've read it takes forever for them to respond (if you're lucky).

Anyone have any thoughts/opinions? I really want to get this installed, lol.


ihako

New Member
Messages
2
Likes
7
Location
Clarksville, TN, USA
Hey guys,

Got this installed over the weekend. I'll attach some pictures below, but there's a clip that keeps the set screw/socket half of the connector attached to the ball of it. You have to cut off the plastic socket connector and attach the new connector with set screws. There's a flat notch on the rod to keep the plastic connector firmly attached - I put one of the set screws right over that flat spot with some loctite to make sure it won't come off.

PXL_20220205_203446051.jpg
PXL_20220205_204450391.jpg

Hope this can maybe help someone in the future!


Woods247

2000 Post Club
Messages
2,527
Likes
4,401
Location
Atl
My old original first gen linkage is still holding up. I keep a spare in my glovebox just in case but so far I’ve been lucky I guess. Is anyone else still using the original without a problem?


Mjfist

Member
Active Duty U.S. Air Force
Messages
6
Likes
2
Location
South korea
20221203_161617.jpg
Boys, had my shifter installed all for 3 days now. It was working well for the first day. And now in 1st and 5th the shifter shaft binds on that reverse lockout pin and its wearing away the metal. Anyone got an idea how to fix this? Do I need to do something to the cables?


Jaguirre11

New Member
Messages
3
Likes
1
Location
Wilmingtom
Hey everyone.. I’m hoping someone here has some insight for me on an issue that I’m currently having. I installed a coolerworx shifter about a month ago, and after 3 weeks of working great, shifting into 1st started feeling a little tight, and shifting into reverse was even tighter.

By the next day I was completely unable to shift into reverse anymore. I removed the battery and adjusted the cables and was immediately able to shift into reverse again, and the rest of the gears felt even better than before.

A week later reverse started feeling tight again, and just like last time I was completely unable to shift into reverse. This time adjusting the cables didn’t solve my problem.

Any ideas on where I should go from here? Gears 1-6 are still buttery smooth. Appreciate ANY help I can get. Thanks everyone


Mjfist

Member
Active Duty U.S. Air Force
Messages
6
Likes
2
Location
South korea
Hey everyone.. I’m hoping someone here has some insight for me on an issue that I’m currently having. I installed a coolerworx shifter about a month ago, and after 3 weeks of working great, shifting into 1st started feeling a little tight, and shifting into reverse was even tighter.

By the next day I was completely unable to shift into reverse anymore. I removed the battery and adjusted the cables and was immediately able to shift into reverse again, and the rest of the gears felt even better than before.

A week later reverse started feeling tight again, and just like last time I was completely unable to shift into reverse. This time adjusting the cables didn’t solve my problem.

Any ideas on where I should go from here? Gears 1-6 are still buttery smooth. Appreciate ANY help I can get. Thanks everyone

Bro its the two shifter adjustment shafts on the coolerworx shifter that connect to the cables. Adjust those two nuts until everything goes in smoothly. You will just have to play with it a bit, when you get it right make sure to lock both nuts on each side to lock in the setting.


Attachments

Jaguirre11

New Member
Messages
3
Likes
1
Location
Wilmingtom
Bro it’s the two shifter adjustment shafts on the coolerworx shifter that connect to the cables. Adjust those two nuts until everything goes in smoothly. You will just have to play with it a bit, when you get it right make sure to lock both nuts on each side to lock in the setting.
Hell yes thank you man. Gonna get after it tomorrow morning.


Messages
24
Likes
6
Location
OC
Hey guys,

Got this installed over the weekend. I'll attach some pictures below, but there's a clip that keeps the set screw/socket half of the connector attached to the ball of it. You have to cut off the plastic socket connector and attach the new connector with set screws. There's a flat notch on the rod to keep the plastic connector firmly attached - I put one of the set screws right over that flat spot with some loctite to make sure it won't come off.

View attachment 46801
View attachment 46800

Hope this can maybe help someone in the future!

I'm baffled by this design, is it actually necessary to do this? I'm going to try and pop my stock shifter cable straight on the steel ball first, would hate to have to replace the shifter cable if going back to stock down the road.


Mjfist

Member
Active Duty U.S. Air Force
Messages
6
Likes
2
Location
South korea
I'm baffled by this design, is it actually necessary to do this? I'm going to try and pop my stock shifter cable straight on the steel ball first, would hate to have to replace the shifter cable if going back to stock down the road.
I popped the stock plastic right on to the ball. I spent about an hour trying to figure out how to take that plastic piece off without damaging it it looked like it needed some sort of special tool to remove it. I'm sure it's some special tool with some name I never heard of. I would have loved to put the provided metal joint cap on that came with the shifter but didn't want to destroy the oem plastic piece. I already had to cut enough and destroy enough just to make the oem trim fit with this thing.


Messages
24
Likes
6
Location
OC
Did my install last night and Mjfist was right, you can just pop the stock cable end on. I emailed Coolerworx asking if this was possible and why they changed the design and of course did not get a response.

As a side note, I'm too lazy to remove the Whoosh short shift plate so I moved the ball end from 25% reduction to 15% reduction. At 25% I could not find neutral reliably. It feels good like this but I'm concerned about the additional leverage being applied to the ball ends, might remove the plate later but it's drivable like this.

Overall install is pretty easy if you reference spark plug Steve's video except for where he bolted the base on before installing cables. Do the opposite; install the cable brackets, then put the cable ends on the steel balls, then pull the whole shifter back and set it on the studs. Getting the front passenger side nut on was difficult, the secret here is to lift the shifter base up a bit and slide the nut in from the side, then push the whole base forward and slap a long 10mm socket on the nut before letting go and tightening the nut. Hard to explain but hopefully that is helpful to someone struggling.


Attachments

1nsanity

Member
Premium Account
Messages
17
Likes
30
Location
San Francisco, CA, USA
,
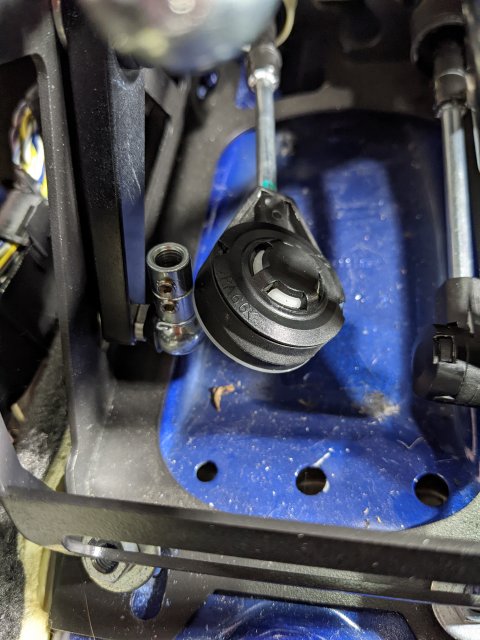
Had been putting this off for quite some time but decided to just do it. Buddy had gotten one but for his FOST and finally sold on it, though after finding this thread at the tail end of install as wasn’t sure how to get the shift cable’s plastic boot end fitting to anchor on which happened to be their “redesign” fix

So jist of it is` history shows prone part failure, non existent customer support on purchasing replaceable parts, or even responding back to inquiries, made me debate, though did not take to long as was already deep in to install.

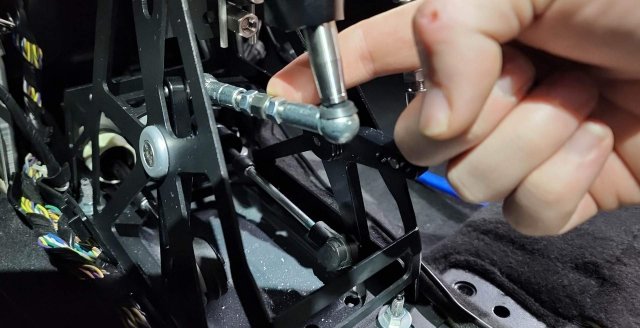
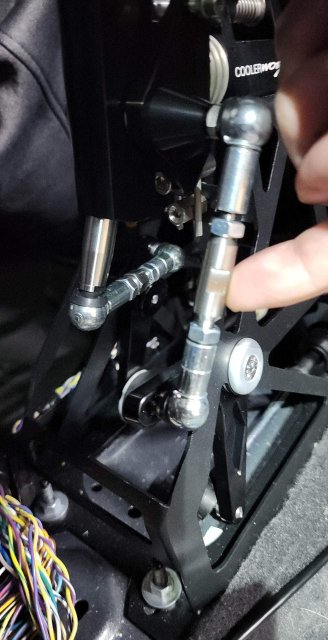
No instructions from the company but Whoosh did offer a pretty detailed video which made it a breeze, except for the updated part which required cutting, and, frankly, will most likely fail as the design fix looks pretty flawed on these little set screws trying to keep the cable from slipping out.

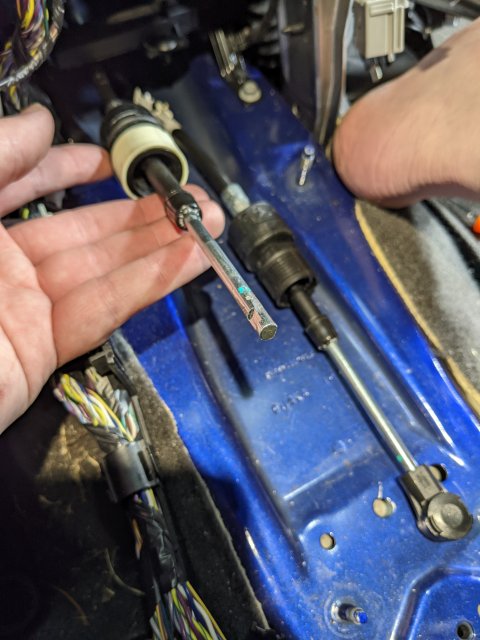
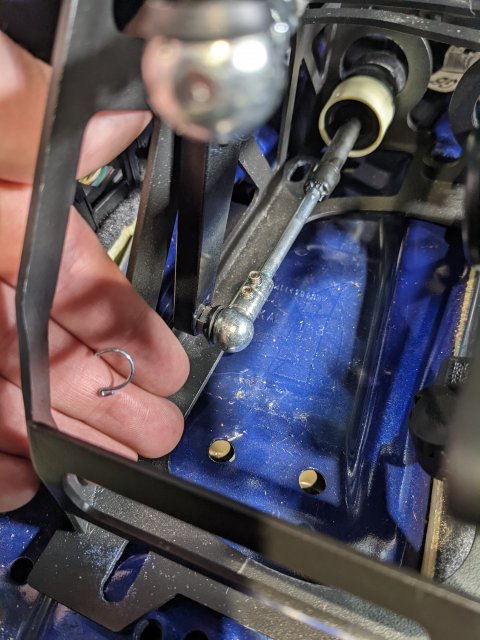
I wish I had caught the solution on just popping stock cable end worked on the ball before I had already started cutting
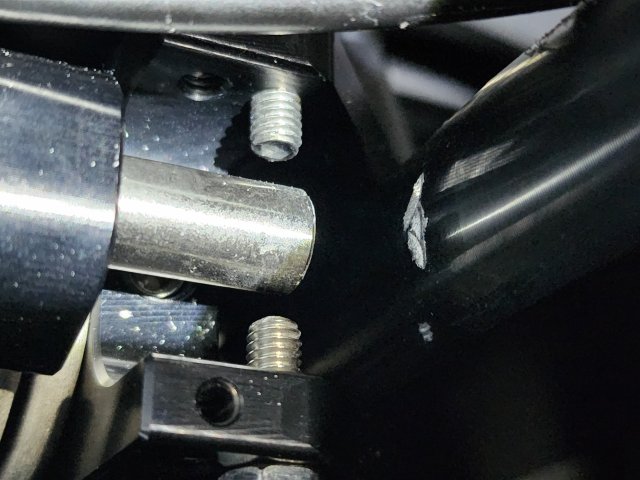
Anyway, my cable had no notch or indenture really for at least one of the screws to have a stable hold. I can probably shave in one for now. Possibly a gear clamp on top of the blue Loctite on the set screws on that cable?

In any case, will no longer be able to switch back to oem as easily as I believe that part cut will only be sold as one piece with a new cable?
But once you can get past all these little dramas, and like I did, just commit to the experience of operating one…

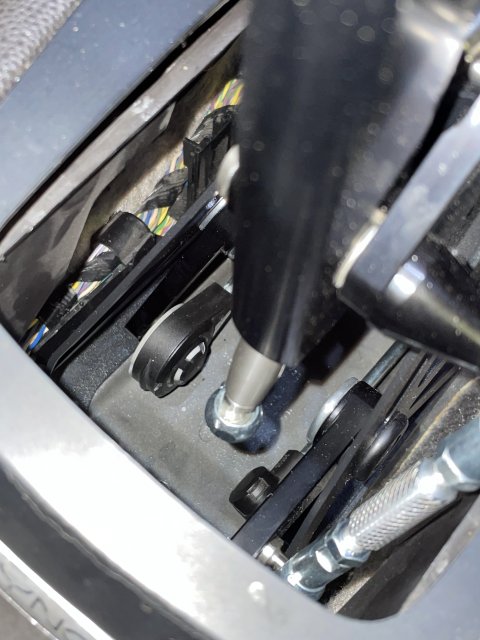
Anyway, Install when it arrived in the later afternoon yesterday. Today dialed it in once I got the jist of things and after that final test run… heheheheh…

I can figure out solutions tomorrow after another drive…


Attachments

Similar threads


Top