So here's my Half Assed Guide to Installing a Backup Camera without permanently Damaging your car and without adding a new Head Unit/Extra Screen
Video for Forscan programing that I used:
View: https://www.youtube.com/watch?v=DMpCD_f669o&t=955s
Forscan OBDII port: https://www.amazon.com/Forscan-Scan...s=ELM327+OBD2+connector&qid=1647026238&sr=8-2
Best Camera that fits in the license plate light(the light on it is cooler than stock so plan on putting in a replacement 5000k or cooler led in the other light): https://www.amazon.com/Reversing-Rearview-License-Replacement-Waterproof/dp/B07PRS72K6/ref=sr_1_9?crid=31ACOEL5U98WX&keywords=fiesta+st+backup+camera&qid=1646843204&sprefix=fiesta+st+back,aps,162&sr=8-9
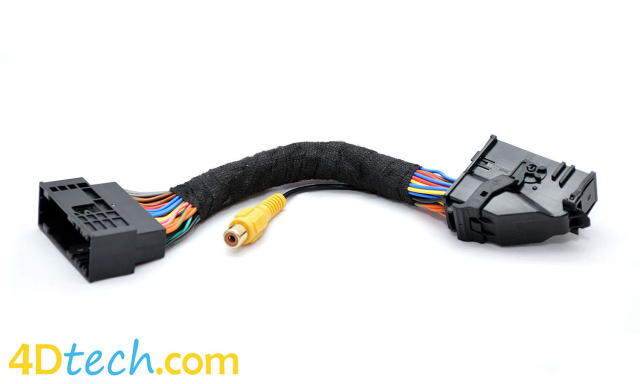
Adapter for radio harness that adds back up camera pins: https://www.ebay.com/itm/363864743756?mkcid=16&mkevt=1&mkrid=711-127632-2357-0&ssspo=mbgc7-bot1c&sssrc=2349624&ssuid=HLOC2lJrQp-&var=&widget_ver=artemis&media=SMS
Also needed: 20-22 Gauge wire, Wire stripers, Wire fisher/mechanics wire, heat-shrink, Solder and soldering “gun”(all connections should be soldered and at least Electrical taped to reduce interference), Multi-meter to test connections.
When I installed my back up camera(twice due to body shop destroying my first) it took a lot of time but was a huge benefit added to my car. It has been a few months since I installed my second one but while browsing some forums I saw people drilling holes in their car behind their license plate and I felt that I had to stop people from doing horrible irreversible damage to their car. But the install is fairly simple except for the Forscan programing but that is why I linked the video.
First off the video I linked for the Forscan is a decent video to follow along with but I wrote this out so its easy to find the information. To start take off the interior trim on the hatch(3 screws and then pulls off but be very careful). Unscrew the bolts that hold the exterior middle moulding that holds the license plate lights. Carefully take off the exterior moulding and unplug the connector, take out the light on the drivers side and put the camera in so that the light on the camera is closest to the license plate. Connect the wire for the light then push the wires for the camera through the grommet and test to make sure the license plate light works.
You can use the connector/wire they supply with it but you have to connect the wires to pins in the end no matter what so I prefer to use my own good wire instead of the wire they supply because it rips way to easily and I don’t trust it to hold up especially in areas that move. I personally cut off the rca connector so make fishing the wire easier(you can splice the wires to the connector later on). Use the fishing wire to fish 3 wires from the bottom of the hatch through the car body panels and then trough the rubber grommet that connects to the car itself(it takes a long time). One of the three wires goes to one of the tail lights and you will need to splice into the reverse lights. The other two will go directly to the head unit.
You can do the Forscan programing before the next step if you would like but you can do it at the end. Take off the Radio head unit trim and the screen(trim has 4-6 clips that just pull out and the screen is held in with 4 Torx screws). Remove the wiring harness in the head unit(the lever release is weird just know you have to raise the lever toward the wires coming out the side). From here just run the wires from the back into the space that the factory head is located.
Put this adapter in between the original harness and the head unit: https://www.ebay.com/itm/3638647437...HLOC2lJrQp-&var=&widget_ver=artemis&media=SMS
Splice the original rca connection to the wire you ran and connect that to the female rca on the new adapter.
(Other way of doing it that is harder and takes more time)Take the plastic connector off of the wiring blocks(main wiring harness) and try not to damage the connector like I did(“should” just slide out while depressing the side stops). Connect the 2 wires to female terminals(provided on the list). The terminals will go into the 14 and 15 slots in the wiring block(I believe that the 14 is the “negative” and the 15 is “positive” but it has been awhile so don’t quote me on that). Make sure the terminals are at the same depth as the others already in the block.
After this you should be done and your camera should work after the Forscan programing, you can also turn off the reverse delay in your sync settings so that it doesn’t give you a warning when you take the car out of reverse. That is really all that I remember from when I did it so ask questions if you have them.
Video for Forscan programing that I used:
Forscan OBDII port: https://www.amazon.com/Forscan-Scan...s=ELM327+OBD2+connector&qid=1647026238&sr=8-2
Best Camera that fits in the license plate light(the light on it is cooler than stock so plan on putting in a replacement 5000k or cooler led in the other light): https://www.amazon.com/Reversing-Rearview-License-Replacement-Waterproof/dp/B07PRS72K6/ref=sr_1_9?crid=31ACOEL5U98WX&keywords=fiesta+st+backup+camera&qid=1646843204&sprefix=fiesta+st+back,aps,162&sr=8-9
Adapter for radio harness that adds back up camera pins: https://www.ebay.com/itm/363864743756?mkcid=16&mkevt=1&mkrid=711-127632-2357-0&ssspo=mbgc7-bot1c&sssrc=2349624&ssuid=HLOC2lJrQp-&var=&widget_ver=artemis&media=SMS
Also needed: 20-22 Gauge wire, Wire stripers, Wire fisher/mechanics wire, heat-shrink, Solder and soldering “gun”(all connections should be soldered and at least Electrical taped to reduce interference), Multi-meter to test connections.
When I installed my back up camera(twice due to body shop destroying my first) it took a lot of time but was a huge benefit added to my car. It has been a few months since I installed my second one but while browsing some forums I saw people drilling holes in their car behind their license plate and I felt that I had to stop people from doing horrible irreversible damage to their car. But the install is fairly simple except for the Forscan programing but that is why I linked the video.
First off the video I linked for the Forscan is a decent video to follow along with but I wrote this out so its easy to find the information. To start take off the interior trim on the hatch(3 screws and then pulls off but be very careful). Unscrew the bolts that hold the exterior middle moulding that holds the license plate lights. Carefully take off the exterior moulding and unplug the connector, take out the light on the drivers side and put the camera in so that the light on the camera is closest to the license plate. Connect the wire for the light then push the wires for the camera through the grommet and test to make sure the license plate light works.
You can use the connector/wire they supply with it but you have to connect the wires to pins in the end no matter what so I prefer to use my own good wire instead of the wire they supply because it rips way to easily and I don’t trust it to hold up especially in areas that move. I personally cut off the rca connector so make fishing the wire easier(you can splice the wires to the connector later on). Use the fishing wire to fish 3 wires from the bottom of the hatch through the car body panels and then trough the rubber grommet that connects to the car itself(it takes a long time). One of the three wires goes to one of the tail lights and you will need to splice into the reverse lights. The other two will go directly to the head unit.
You can do the Forscan programing before the next step if you would like but you can do it at the end. Take off the Radio head unit trim and the screen(trim has 4-6 clips that just pull out and the screen is held in with 4 Torx screws). Remove the wiring harness in the head unit(the lever release is weird just know you have to raise the lever toward the wires coming out the side). From here just run the wires from the back into the space that the factory head is located.
Put this adapter in between the original harness and the head unit: https://www.ebay.com/itm/3638647437...HLOC2lJrQp-&var=&widget_ver=artemis&media=SMS
Splice the original rca connection to the wire you ran and connect that to the female rca on the new adapter.
(Other way of doing it that is harder and takes more time)Take the plastic connector off of the wiring blocks(main wiring harness) and try not to damage the connector like I did(“should” just slide out while depressing the side stops). Connect the 2 wires to female terminals(provided on the list). The terminals will go into the 14 and 15 slots in the wiring block(I believe that the 14 is the “negative” and the 15 is “positive” but it has been awhile so don’t quote me on that). Make sure the terminals are at the same depth as the others already in the block.
After this you should be done and your camera should work after the Forscan programing, you can also turn off the reverse delay in your sync settings so that it doesn’t give you a warning when you take the car out of reverse. That is really all that I remember from when I did it so ask questions if you have them.
Last edited: