• Sign Up! To view all forums and unlock additional cool features

    Welcome to the #1 Fiesta ST Forum and Fiesta ST community dedicated to Fiesta ST owners and enthusiasts. Register for an account, it's free and it's easy, so don't hesitate to join the Fiesta ST Forum today!


My Euro Retrofit Headlight Project

Messages
435
Likes
406
Location
Simi Valley, CA, USA
#1
I finally started work on my headlight project and wanted to start a dedicated thread so other can follow along.

This has similarities with many of the headlight threads on here, plenty of people have Euro headlights, some have done retrofits on the stock headlights, but I haven't seen any retrofits on the Euro headlights.

To me the aftermarket Euro's are the perfect platform to retrofit: stories of the factory permaseal on the OEM units pushed me away from wanting to mess with those (as you'll see below getting these lenses off is difficult enough), since the Euro's are stock projectors, it will make mounting other projectors much easier and cleaner, and with the Euros you get the LED strip light which I think is a cool bonus.

My parts list is:
DEPO Fiesta Mk 7 Euro headlights
Morimoto 4TL-R HID projectors
Morimoto 35W 5K HID bulbs
Morimoto 35W ballasts
Retrofitsource H7 wire harness
80mm Profile LED halo's
Morimoto 2Stroke 2.0 H1 bulbs (hi beam)
Hi-beam splitters

The retrofit parts I purchased from theretrofitsource.com

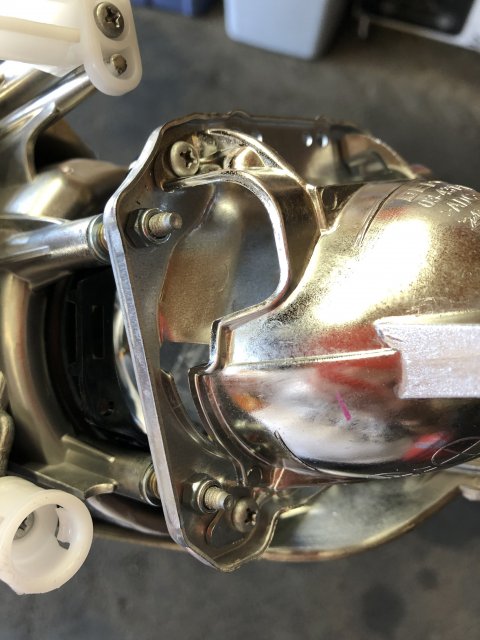
In this first installment I have separated the lens from just one of the headlights so far. Since our headlights don't fit in an oven (conventional home size) we're stuck using a heat gun. Getting this first lens off took me two sittings, about 2 hours each. I work slow and on this first one it was my learning time. I still managed to break one of the tabs that mounts the LED strip assembly to the main housing. I think the reason for this is that the LED also mounts to the outer shroud piece, and this shroud has tabs that are sandwhiched between the lens and the housing, so pulling the lens off, the shroud piece came with it. I'll be more careful on the 2nd one and try to get a screw driver in there and pull the screws out first.

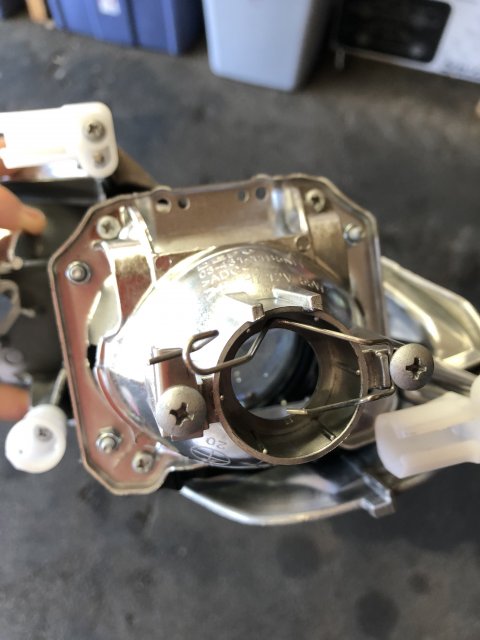
The first step for pulling the lenses off on the Depo headlights is pulling the pins out shown in the 3rd pic, there are 3 of these around the edge of the housing. Just focus your heat around them, them pull them out. Then its just a slow process of heating areas and working on separating. I used an awl, and would just scrape out as much sealant as I could. Then when it seemed like it was good, I spent more time working the heat gun around the entire perimeter and started pulling it off.


Attachments

OP
New_Daily
Messages
435
Likes
406
Location
Simi Valley, CA, USA
Thread Starter #2
Next step will be pulling the 2nd lens. Unless it turns out very different, I probably wont post pics on that one. Then it will be working on mounting the new projectors. After that, painting.

Like I said I work slow, and some nights don't feel like working on it at all, so this will likely take me some time for the whole project


HardBoiledEgg

1000 Post Club
Messages
1,076
Likes
516
Location
Fontana
#3
I PLAN ON DOING THIS WITH THE HELLA BRAND

CURIOUS HOW THE TL-R FITS AND MOUNTS IN THERE. I WANT A FULL OE SET UP BUT NOT SURE HOW THAT WILL FIT


OP
New_Daily
Messages
435
Likes
406
Location
Simi Valley, CA, USA
Thread Starter #4
I PLAN ON DOING THIS WITH THE HELLA BRAND

CURIOUS HOW THE TL-R FITS AND MOUNTS IN THERE. I WANT A FULL OE SET UP BUT NOT SURE HOW THAT WILL FIT
I saw a retorfit that Lightwerkz did with these projectors and according to him, the TL-R were the closest to the stock fit out of all the Morimoto models. And looking how the stocks mount, I should just be able to drill a hole in the plate on the Morimoto's to hit all 3 mounting points.

The stock projectors mount to the projector shroud which is all one piece with the hi-beam reflector. Ill take a close up pic of that portion later today


OP
New_Daily
Messages
435
Likes
406
Location
Simi Valley, CA, USA
Thread Starter #6
This is how they mount. This is the combo hi-beam reflector / projector shroud. They mount directly to this which in turn mounts to the housing via the large ball end mounts one being the leveling motor and the manual adjuster.


Attachments

Messages
30
Likes
21
Location
Jakarta, Indonesia
#8
A few friends of mine tried retrofitting, but many seem to have problems once the retrofit is done. Some have condensation, some have cloudy lenses, some have water leaking into the assembly. I guess most importantly is the final step where the sealing is done, it has to be perfect to avoid these problems. In my opinion, using regular sealants will have some kind of time limit once the sealant starts to degrade, so best bet is to check periodically.


OP
New_Daily
Messages
435
Likes
406
Location
Simi Valley, CA, USA
Thread Starter #9
Retrofit Source sells a butyl rubber sealant to seal the lights back up, This is what I used on my retrofit project on my Tacoma and they have been perfect with no condensation. The Tacoma Depo lights also have silica gel packs in them already, and I think I might put some in these headlights if I can find a way to secure them down. Retrofit sells them as well.

https://www.theretrofitsource.com/morimoto-retrorubber-butyl-glue-A-BUTYL?quantity=1


HardBoiledEgg

1000 Post Club
Messages
1,076
Likes
516
Location
Fontana
#11
YEAH IF YOUR HEADLIGHTS ARE LEAKING, YOU DID SOMETHING WRONG

I OPENED UP MANY SETS OF LIGHTS AND NEVER HAD AN ISSUE


OP
New_Daily
Messages
435
Likes
406
Location
Simi Valley, CA, USA
Thread Starter #12
I'm just here to follow along :)
I've been itching to make more progress, but it's approx a million degrees here in SoCal and something about working with a heat gun in a garage with no cross breeze that's already 100 is not appealing.

But I've made decision on planning painting the interior pieces. But I'll save those surprises for pics when it's completed ;)


MagnetiseST

1000 Post Club
Premium Account
Messages
1,311
Likes
1,153
Location
Dania Beach
#13
I've been itching to make more progress, but it's approx a million degrees here in SoCal and something about working with a heat gun in a garage with no cross breeze that's already 100 is not appealing.

But I've made decision on planning painting the interior pieces. But I'll save those surprises for pics when it's completed ;)
I dont blame you. I had a set of stock lights to retro, and I was so impatient that I cut the lens off of one light instead of trying to heat it up.


HardBoiledEgg

1000 Post Club
Messages
1,076
Likes
516
Location
Fontana
#14
I'M ALSO WATCHING CAUSE IF YOU'RE IN SOCAL ID LIKE TO MAYBE PAY YOU TO DO MINE CAUSE I THOUGHT I GAVE UP HEADLIGHT RETROS YEARS BACK LOL


OP
New_Daily
Messages
435
Likes
406
Location
Simi Valley, CA, USA
Thread Starter #15
Put another 1.5 - 2 hours in on Sunday, stewing in my own sweat, on the 2nd headlight. Still don't quite have it apart but next go around I should be able to get it apart.

Once they're both apart work will progress faster cause I'll be able to paint and mount the new parts etc.


Messages
354
Likes
364
Location
Maine
#16
Put another 1.5 - 2 hours in on Sunday, stewing in my own sweat, on the 2nd headlight. Still don't quite have it apart but next go around I should be able to get it apart.

Once they're both apart work will progress faster cause I'll be able to paint and mount the new parts etc.
If you need any help, let me know!


OP
New_Daily
Messages
435
Likes
406
Location
Simi Valley, CA, USA
Thread Starter #17
If you need any help, let me know!
Thanks! The help I need is mostly motivation. And you’d think after putting about $800 into it ($330 for the euro headlights and $450 for the retrofit parts), wanting to have the the headlights on and getting the damn huge boxes of stuff out of my cramped garage, that would be all the motivation I’d need. But separating the lens and housing is a PITA especially since I don’t want to rush or be hamfisted and break something.

But once I get the 2nd one apart I think it will move faster


Messages
354
Likes
364
Location
Maine
#18
Thanks! The help I need is mostly motivation. And you’d think after putting about $800 into it ($330 for the euro headlights and $450 for the retrofit parts), wanting to have the the headlights on and getting the damn huge boxes of stuff out of my cramped garage, that would be all the motivation I’d need. But separating the lens and housing is a PITA especially since I don’t want to rush or be hamfisted and break something.

But once I get the 2nd one apart I think it will move faster
If you wanted to ship them to me, I’d be happy to do them!
I could also give you some tips as well.


OP
New_Daily
Messages
435
Likes
406
Location
Simi Valley, CA, USA
Thread Starter #19
If you wanted to ship them to me, I’d be happy to do them!
I could also give you some tips as well.
Thanks, I appreciate the offer. I’m familiar with retrofits in general as I’ve done them in my Tacoma. I know everyone says the taco is one of the easiest to do retrofits on, but since I’m swapping one type of projector for another I don’t have to deal with mounting of projectors in reflector bowls. I’m also gonna do some special flavor with the painting.


Messages
30
Likes
21
Location
Jakarta, Indonesia
#20
Is there any chance that someone here knows how to wire up for the headlight leveling to be activated with the switch that has the leveling function?


Similar threads


Top