The install was straight forward, but tedious. I used Mountune's instructions for the bulk of it. I did take the bumper off to try to create room because the AC condenser and radiator are so close. The tabs will need to be modified as well (maybe measure the stock tabs on the OE radiator and try to modify the new tabs to match, shave off some of the opening on the tabs to allow them to fold over the tabs on the AC condenser). Also, the bypass fitting is super fragile so be careful taking that off, mine broke and I used a rubber radiator cap from AutoZone and a house clamp to plug it. Overall, it took me about 8 hours working alone.

-
Sign Up! To view all forums and unlock additional cool features
Welcome to the #1 Focus RS Forum and Focus RS community dedicated to Focus RS owners and enthusiasts. Register for an account, it's free and it's easy, so don't hesitate to join the Focus RS Forum today!
Contestant #3 enters the radiator scene
- Thread starter Business6
- Start date
Trader history for Business6 (3)

Not to be an ass, but you get what you pay for. Not a big deal to modify, but hopefully the next batch dont have that issue

I mean, if the radiator itself does a great job, that is a small price to pay. I'd much rather deal with a little finagling than pay almost twice the price for something that is going to do the same exact job and not actually do it any better.
I don't disagree, however when I'm paying for something that is supposed to bolt on, I expect it to not need modification.
The Mountune sells out about as soon as they get them it appears, but they must not have many back orders as it was in stock when I ordered.....I decided to get one after a summer visit to the southwest this year and it was on sale, in stock and delivered in 4 days just 2 months ago. So I would get on a waiting list to get one if you want the Mountune, mine was for future installation so time was not a concern, just got lucky I guess.
Since I will pay to have it installed I do not need products that must be modified. As said above you get what you pay for, at least most of the time. My experience with Mountune is you pay for the quality and get it. If I pay extra labor to have a product modified to install that is not a drop-in item I haven't saved a penny and probably have a lesser quality part. If I could do the labor I may be attracted to the cost savings with "free" labor as I was in my building days. But now quality and reliability are more important and cost some what less important than it was then.
yeah it cools the car down great, i havent taken it to the canyons or track yet but as far as cooling goes it is great. im happy with it.
Fair enough, I understand.
We all have different priorities, budgets, willingness to do things ourselves and different opinions of what is valuable.
For me, of it does it's job as intended (aside from messing with tabs a bit), I only have to install it once, so it's a great deal. I also enjoy working on my car so labor is not a huge deal to me.


Reading this alone is enough to say its not worth the extra savings of cost. I'm glad you look at it from the bright side, but if this were me I'd have been pissed. I was pissed enough when the Mishimoto unit I installed had some leftover solder/flux on one of the parts that I had to shave down to fit the fan controller. I hope Ron can help you out with getting you a better one, or helping you in some way. Hopefully the next set of these has better fitment.
Hopefully V2 doesn't have these issues. I would message @whooshmotorsports and see if you can get your money back or something. Or if there's a better way.
The tabs will need to be modified as well (maybe measure the stock tabs on the OE radiator and try to modify the new tabs to match, shave off some of the opening on the tabs to allow them to fold over the tabs on the AC condenser)..
Not to be an ass, but you get what you pay for. Not a big deal to modify, but hopefully the next batch dont have that issue
I mean, if the radiator itself does a great job, that is a small price to pay. I'd much rather deal with a little finagling than pay almost twice the price for something that is going to do the same exact job and not actually do it any better.
It seems lik
It seems like they never have them in stock, lol.
I hope the whoosh radiator works well. It's october and we're still seeing 100f+ weather here.
I'm also glad that there is finally an option that isn't between $550-900. I was getting desperate enough that I was considering the ebay radiator.
It seems like they never have them in stock, lol.
I hope the whoosh radiator works well. It's october and we're still seeing 100f+ weather here.
I'm also glad that there is finally an option that isn't between $550-900. I was getting desperate enough that I was considering the ebay radiator.
The Mountune sells out about as soon as they get them it appears, but they must not have many back orders as it was in stock when I ordered.....I decided to get one after a summer visit to the southwest this year and it was on sale, in stock and delivered in 4 days just 2 months ago. So I would get on a waiting list to get one if you want the Mountune, mine was for future installation so time was not a concern, just got lucky I guess.
Since I will pay to have it installed I do not need products that must be modified. As said above you get what you pay for, at least most of the time. My experience with Mountune is you pay for the quality and get it. If I pay extra labor to have a product modified to install that is not a drop-in item I haven't saved a penny and probably have a lesser quality part. If I could do the labor I may be attracted to the cost savings with "free" labor as I was in my building days. But now quality and reliability are more important and cost some what less important than it was then.
I mean, if the radiator itself does a great job, that is a small price to pay. I'd much rather deal with a little finagling than pay almost twice the price for something that is going to do the same exact job and not actually do it any better.
I don't disagree, however when I'm paying for something that is supposed to bolt on, I expect it to not need modification.
The Mountune sells out about as soon as they get them it appears, but they must not have many back orders as it was in stock when I ordered.....I decided to get one after a summer visit to the southwest this year and it was on sale, in stock and delivered in 4 days just 2 months ago. So I would get on a waiting list to get one if you want the Mountune, mine was for future installation so time was not a concern, just got lucky I guess.
Since I will pay to have it installed I do not need products that must be modified. As said above you get what you pay for, at least most of the time. My experience with Mountune is you pay for the quality and get it. If I pay extra labor to have a product modified to install that is not a drop-in item I haven't saved a penny and probably have a lesser quality part. If I could do the labor I may be attracted to the cost savings with "free" labor as I was in my building days. But now quality and reliability are more important and cost some what less important than it was then.
Since I will pay to have it installed I do not need products that must be modified. As said above you get what you pay for, at least most of the time. My experience with Mountune is you pay for the quality and get it. If I pay extra labor to have a product modified to install that is not a drop-in item I haven't saved a penny and probably have a lesser quality part. If I could do the labor I may be attracted to the cost savings with "free" labor as I was in my building days. But now quality and reliability are more important and cost some what less important than it was then.
We all have different priorities, budgets, willingness to do things ourselves and different opinions of what is valuable.
For me, of it does it's job as intended (aside from messing with tabs a bit), I only have to install it once, so it's a great deal. I also enjoy working on my car so labor is not a huge deal to me.
Alright, I had time this weekend so I went to my local auto hobby shop:
I basically followed the Mountune instructions in order to get the fan and old radiator out (fan went up and out, radiator down and out). iI'll spare the pictures leading up to the removal since its the same.
It took me about 2 hours taking my time to get the old radiator out.
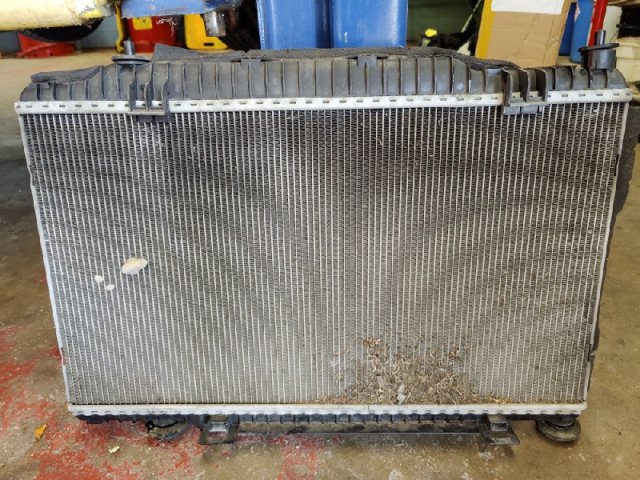
My Dirty old Radiator
Whoosh next to my old one, i did the damage to the old one but notice the minor fin damage on whoosh probably due to shipping.
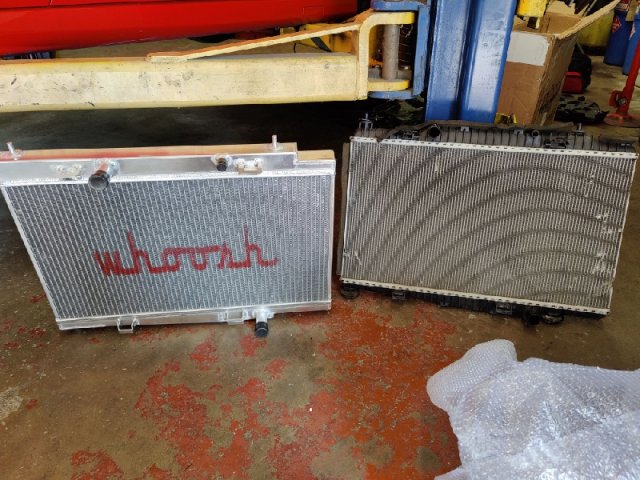
Definitely fatter.
my first fitment issue:

solution: get pliers and tear off a piece. It worked.
Now the unfortunate news: This is not a drop in procedure like Mountune. I repeat, NOT DROP IN. I spent a good hour gradually working whoosh's radiator without damage, but once i got to the point of putting the bottom through with the rubber/metal grommet I noticed I couldn't make the height clearance to attempt the aluminum tabs w/ the ac condenser. And boy I tried...
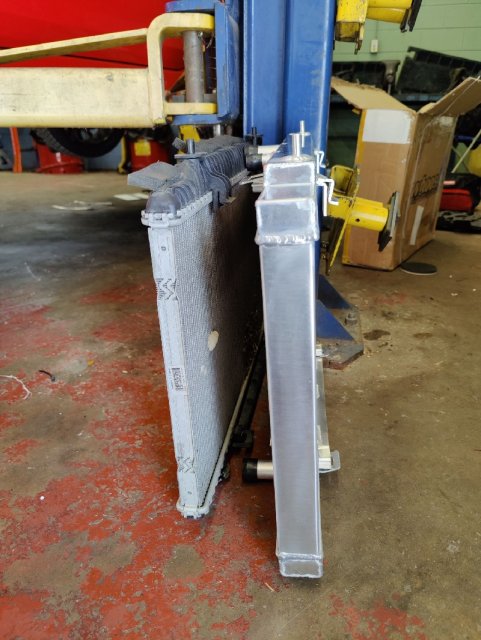
At this point I knew I had to take off the bumper/crash bar for more clearance. I wasn't ready for this so I loaded up the mishimoto radiator instructions on Youtube and followed it step by step, pretty slowly. Anyways, the hobby shop closed so I wrapped things up and my FiST is now in the state below. Hopefully I can finish tomorrow.
I basically followed the Mountune instructions in order to get the fan and old radiator out (fan went up and out, radiator down and out). iI'll spare the pictures leading up to the removal since its the same.
It took me about 2 hours taking my time to get the old radiator out.
My Dirty old Radiator
Whoosh next to my old one, i did the damage to the old one but notice the minor fin damage on whoosh probably due to shipping.
Definitely fatter.
my first fitment issue:
solution: get pliers and tear off a piece. It worked.
Now the unfortunate news: This is not a drop in procedure like Mountune. I repeat, NOT DROP IN. I spent a good hour gradually working whoosh's radiator without damage, but once i got to the point of putting the bottom through with the rubber/metal grommet I noticed I couldn't make the height clearance to attempt the aluminum tabs w/ the ac condenser. And boy I tried...
At this point I knew I had to take off the bumper/crash bar for more clearance. I wasn't ready for this so I loaded up the mishimoto radiator instructions on Youtube and followed it step by step, pretty slowly. Anyways, the hobby shop closed so I wrapped things up and my FiST is now in the state below. Hopefully I can finish tomorrow.
Sterilyze
I hope you enjoy working on your car like I used to. 40 years ago this would have been a Sunday job. But those days are gone. This is why I got the Mountune, I have a price from a shop referred to me from a trusted source to install my Mountune radiator with antifreeze supplied by me for $240. I would not be happy to "tear off a piece". I will have $800 in the Mountune radiator installed with upgraded coolant. Good luck with your endeavors!
I hope you enjoy working on your car like I used to. 40 years ago this would have been a Sunday job. But those days are gone. This is why I got the Mountune, I have a price from a shop referred to me from a trusted source to install my Mountune radiator with antifreeze supplied by me for $240. I would not be happy to "tear off a piece". I will have $800 in the Mountune radiator installed with upgraded coolant. Good luck with your endeavors!
^^^Consider yourselves LUCKY to even have those types of facilities available to you.
Back in the caveman days, when I attended The University Of Arizona (mid 1970s), there were a few of them in Tucson, but NONE whatsoever here in local Pennsyltucky, when I REALLY need them, due to my HOA's Gestapo 'no working on your car even in your very own driveway with severe penalties', bullshit!![[:(!]](/images/smilies/icon_smile_angry.gif "Angry [:(!]")
![[thumbdown]](/images/smilies/icon_smile_thumbsdown.gif "Thumbs Down [thumbdown]")
Back in the caveman days, when I attended The University Of Arizona (mid 1970s), there were a few of them in Tucson, but NONE whatsoever here in local Pennsyltucky, when I REALLY need them, due to my HOA's Gestapo 'no working on your car even in your very own driveway with severe penalties', bullshit!
Update:
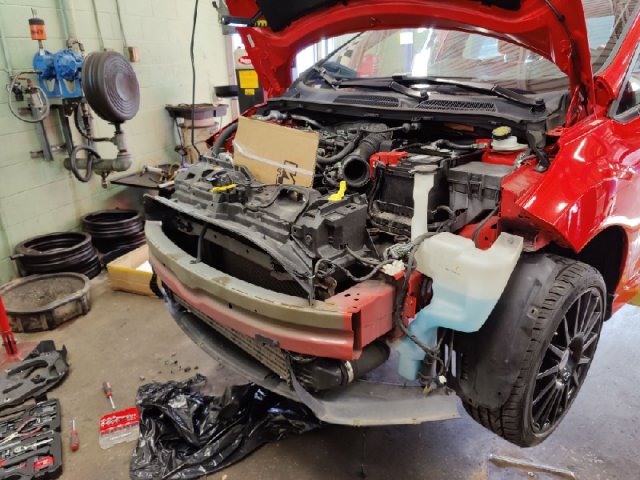
So I finished taking off the crash bar and I really was grateful for my lift, I just plopped the crash bar on 2 buckets and an extra jack stand for good measure. I actually recommend the crash bar route as I had SO much more room to work with, go this way and you are much likely to damage your radiators or ac compressors.
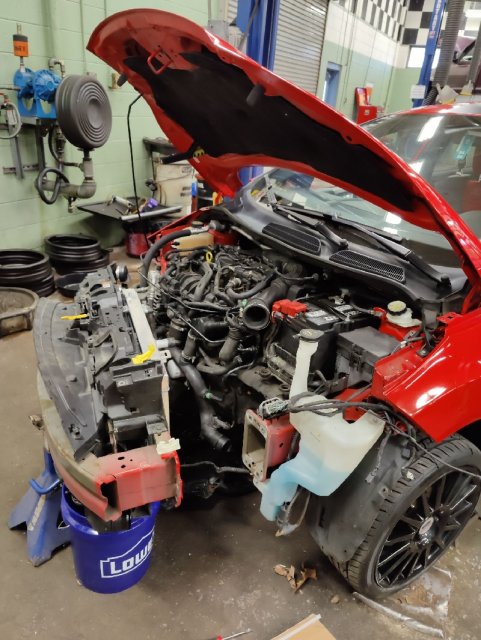
Anyways, I found out the reason I was having a tough time height wise:
I did NOT see this without taking the crash bar out. Worth it!
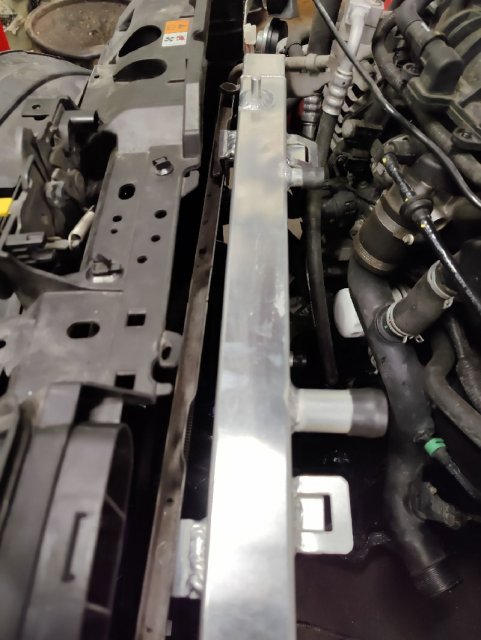
SO were about 1 hr into it, I followed the advice to start modifying the tabs (I used a Dremel with #115 bit, it shaves aluminum pretty well.) I shave the tabs enough so the bottom aluminum tabs can slip under the AC Compressor, took some time but it eventually makes sit in. Alright, time to line it up and start assembling again!
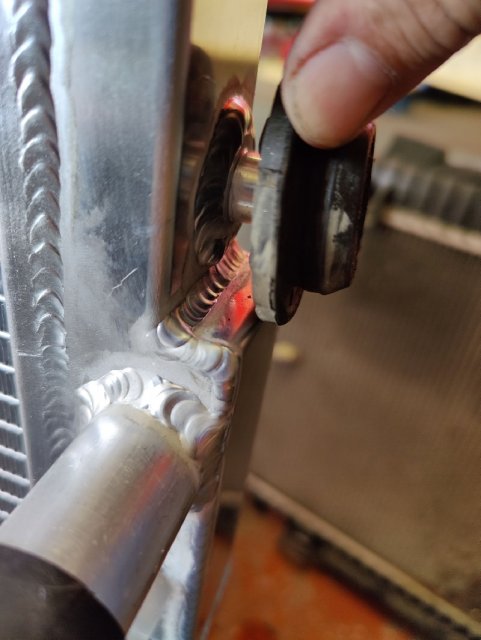
Remember this issue? Turns out that applies to the whole assembly. everything is off by a quarter inch. I would have to cut the entire passenger side's plastic Radiator fitment to make this work. Unfortunately I'm one joe with not enough hands or experience to cut whole sections behind the AC compressor with Freon lines still connected. So I spent the next 3 hours going back to stock radiator, assembling the crash bar and bumper, filling the coolant, and hanging my hat again. I wasted $400 to drain and fill new coolant, basically. At least I put some good worm clamps on the radiator and intake hoses!

So I finished taking off the crash bar and I really was grateful for my lift, I just plopped the crash bar on 2 buckets and an extra jack stand for good measure. I actually recommend the crash bar route as I had SO much more room to work with, go this way and you are much likely to damage your radiators or ac compressors.
Anyways, I found out the reason I was having a tough time height wise:
I did NOT see this without taking the crash bar out. Worth it!
SO were about 1 hr into it, I followed the advice to start modifying the tabs (I used a Dremel with #115 bit, it shaves aluminum pretty well.) I shave the tabs enough so the bottom aluminum tabs can slip under the AC Compressor, took some time but it eventually makes sit in. Alright, time to line it up and start assembling again!
Remember this issue? Turns out that applies to the whole assembly. everything is off by a quarter inch. I would have to cut the entire passenger side's plastic Radiator fitment to make this work. Unfortunately I'm one joe with not enough hands or experience to cut whole sections behind the AC compressor with Freon lines still connected. So I spent the next 3 hours going back to stock radiator, assembling the crash bar and bumper, filling the coolant, and hanging my hat again. I wasted $400 to drain and fill new coolant, basically. At least I put some good worm clamps on the radiator and intake hoses!
Remember this issue? Turns out that applies to the whole assembly. everything is off by a quarter inch. I would have to cut the entire passenger side's plastic Radiator fitment to make this work. Unfortunately I'm one joe with not enough hands or experience to cut whole sections behind the AC compressor with Freon lines still connected. So I spent the next 3 hours going back to stock radiator, assembling the crash bar and bumper, filling the coolant, and hanging my hat again. I wasted $400 to drain and fill new coolant, basically. At least I put some good worm clamps on the radiator and intake hoses!
Update:
So I finished taking off the crash bar and I really was grateful for my lift, I just plopped the crash bar on 2 buckets and an extra jack stand for good measure. I actually recommend the crash bar route as I had SO much more room to work with, go this way and you are much likely to damage your radiators or ac compressors.
View attachment 35850
Anyways, I found out the reason I was having a tough time height wise:
View attachment 35852
I did NOT see this without taking the crash bar out. Worth it!
SO were about 1 hr into it, I followed the advice to start modifying the tabs (I used a Dremel with #115 bit, it shaves aluminum pretty well.) I shave the tabs enough so the bottom aluminum tabs can slip under the AC Compressor, took some time but it eventually makes sit in. Alright, time to line it up and start assembling again!
View attachment 35854
Remember this issue? Turns out that applies to the whole assembly. everything is off by a quarter inch. I would have to cut the entire passenger side's plastic Radiator fitment to make this work. Unfortunately I'm one joe with not enough hands or experience to cut whole sections behind the AC compressor with Freon lines still connected. So I spent the next 3 hours going back to stock radiator, assembling the crash bar and bumper, filling the coolant, and hanging my hat again. I wasted $400 to drain and fill new coolant, basically. At least I put some good worm clamps on the radiator and intake hoses!
View attachment 35857
| Thread starter | Similar threads | Forum | Replies | Date |
|---|---|---|---|---|
|
|
500 HP Hennessey 2016 Ford Focus RS Enters the Shop | Focus RS General Discussions | 0 |
Similar threads
-
 500 HP Hennessey 2016 Ford Focus RS Enters the Shop
- Started by MKIIIRS
- Replies: 0