• Sign Up! To view all forums and unlock additional cool features

    Welcome to the #1 Focus RS Forum and Focus RS community dedicated to Focus RS owners and enthusiasts. Register for an account, it's free and it's easy, so don't hesitate to join the Focus RS Forum today!


2JR Hi-Power Cowl Induction Intake - Reviews/Install Tips/Gains

Trader history for joe@2j-racing (0)

Messages
237
Likes
103
Location
olathe
#41
I can make the file available but I have not got it fitted yet so no guarantees it doesn't need more tweaks. The end should actually be a bit longer, it is on my prototype but my print bed is only 9.7 inches long so I had to snip the tip. I am going to get this done but my makerbot 2x is being a fussy bastard as usual and it needs some TLC first.

Depending on what printer you have I don't know that I would try this with PLA, it might get to warm on a hot summer day for PLA to hold up.

Here is a pic of the cardboard version I made to test fitment.

IMG_1504.JPG


CanadianGuy

4000 Post Club
Messages
4,097
Likes
942
Location
Southern Ontario
#42
I can make the file available but I have not got it fitted yet so no guarantees it doesn't need more tweaks. The end should actually be a bit longer, it is on my prototype but my print bed is only 9.7 inches long so I had to snip the tip. I am going to get this done but my makerbot 2x is being a fussy bastard as usual and it needs some TLC first.

Depending on what printer you have I don't know that I would try this with PLA, it might get to warm on a hot summer day for PLA to hold up.

Here is a pic of the cardboard version I made to test fitment.

View attachment 4869
Here is a silly idea to make a NICE form fit. Use a bag and spray foam insulation. Use the low expanding type for around windows. I did that a few times to fill voids and since it is in a bag it can be easily cut to remove. Just saying...

Similar to this
http://www.spray-insulation.co.uk/pck5_IMG0001.jpg
very form fitting.

If you are worried the bag will break use some spray oil on the parts you don't want exposed and consider a double bag.

Seeing your pic I would make two dams out of the cardboard say 1-2" apart and use a bag of spray foam in between. Once set get rid on the cardboard.


Hijinx

3000 Post Club
U.S. Air Force Veteran
Messages
3,290
Likes
1,669
Location
Auburn, AL, USA
#43
Here is a silly idea to make a NICE form fit. Use a bag and spray foam insulation. Use the low expanding type for around windows. I did that a few times to fill voids and since it is in a bag it can be easily cut to remove. Just saying...

Similar to this
http://www.spray-insulation.co.uk/pck5_IMG0001.jpg
very form fitting.

If you are worried the bag will break use some spray oil on the parts you don't want exposed and consider a double bag.

Seeing your pic I would make two dams out of the cardboard say 1-2" apart and use a bag of spray foam in between. Once set get rid on the cardboard.
I considered it, but haven't put the idea into motion. Tired of going in and out of there with ideas.


Hijinx

3000 Post Club
U.S. Air Force Veteran
Messages
3,290
Likes
1,669
Location
Auburn, AL, USA
#45
I can make the file available but I have not got it fitted yet so no guarantees it doesn't need more tweaks. The end should actually be a bit longer, it is on my prototype but my print bed is only 9.7 inches long so I had to snip the tip. I am going to get this done but my makerbot 2x is being a fussy bastard as usual and it needs some TLC first.

Depending on what printer you have I don't know that I would try this with PLA, it might get to warm on a hot summer day for PLA to hold up.

Here is a pic of the cardboard version I made to test fitment.

View attachment 4869
Have you made any progress?


Messages
78
Likes
3
Location
south elgin
#46
Feeln like an idiot here. Got the intake, took everything apart. Cutting the cowl was the worse and it took more removal of material then I've seen here. The fit is extremely tight. Cut the metal. for the wiper mount (if it was lh drive) and its still tight. Do you leave the black plastic grill on the fresh air intake? Has everyone's been tight to get assembled ? Not just the plastic but the body as well.


Messages
78
Likes
3
Location
south elgin
#48
It won't let me upload. Pictures are to big. I finally got it to fit it's just very tight. Do you put the filter on first then the elbow or put the filter on the elbow and put elbow on turbo?


Messages
144
Likes
21
Location
Miami
#50
So yesterday I had an issue while driving, this is the second time I've had this issue. There are two common factors the intake with the water sock on the filter and heavy rain.
My, car is outside 100% of the time, it is not parked in a garage at home or work. This is what happens, I'm driving around for about 10 minutes, I step on the gas a little and all of a sudden I get a sputtering(sounds like a misfire) that's directly correlated to throttle position. I don't know if the car is taking in water through the intake or if the humidity is playing a factor. At first I thought it was bad gas when it first happened 3 months ago. All I did to correct it was disconnect the battery and reconnect it and the issue goes away. Mind you, no lights come on on the dash, no codes are thrown. The car doesn't go into limp mode cause I'm still able to drive the car around, just at 15% throttle.


Messages
129
Likes
28
Location
Ventura
#51
I installed mine today with the help of a friend. While not terribly difficult it took roughly 3.5 hours as my friend tried to get it into position for 45 minutes but was afraid he might scratch the point. In the end I gave it a shove and it popped right in after about 15 seconds with a cut on each index finger knuckle as a prize. I really enjoy the sound and don't find it terrible loud or annoying, I drove a Neon (not an SRT-4) with a ram-air intake that had a much louder and deeper sound when getting on the gas. This, however, does sound like a jet engine. I forget who said it here but the comparison of the sound it makes while on the freeway to sitting on an airplane behind the engines as it's cruising at altitude is perfectly apt. I love it but the super high pitched squeal it constantly makes as you lightly accelerate at highway speeds will probably get old after a few weeks. I will investigate some sound deadening in the future for sure but so far it's great!

My notes:

1. The stock MAF sensor screws absolutely did not fit in the new MAF location holes on the intake. The threads were completely different, luckily I have a box laying around with 20+ years worth of random screws and found two that threaded in perfectly.
2. We put the big hose on the turbo side first, slid both clamps down onto it then finessed the intake in. Once in position we slid the clamps up onto the hose and tightened the lower one first, put the filter on the intake, cut the hole in the lower cowl cover, bolted it in, then tightened the last clamp on the hose.
3. The MAF harness extender is worth it's weight in gold due to the time savings and plug'n'play functionality. Highly recommended if you're squeamish about cutting and rewiring it yourself.
4. I opted to get the water-sock but it has not arrived yet, I imagine that it will be needed for sure in more rainy climates. I live in southern California and still feel like it's needed, very worth it for a little bit more peace of mind.

All in all I think it's a great product but the disclaimer 2J Racing makes in saying that it's loud is definitely true, if you don't want to live with much louder than average turbo noises at almost all times then I'd say stick with the stock unit. If that doesn't bother you then I think this is probably your best bet in terms of bang for your buck performance. I will be working on sealing up the area around the lower cowl where the intake tube passes through then doing some logging to see what my temps are like.

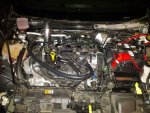
Pictures and videos:

1.jpg

2.jpg

Taking off from a stop:
[video=youtube;Z51XMMf48ko]https://www.youtube.com/watch?v=Z51XMMf48ko&feature=youtu.be[/video]

On the freeway around 75MPH in 6th:
[video=youtube;4ix14HBn4k8]https://www.youtube.com/watch?v=4ix14HBn4k8&feature=youtu.be[/video]


westcoaST

1000 Post Club
Messages
1,157
Likes
290
Location
Corona
#52
I finally got my baffle working properly, without it buzzing at low idle. I made a baffle which fits between the 2JR Intake and air filter/sock and the A/C Inlet. I took an aluminum sheet and cut and bent it so it provides a path for air to enter the inlet, but the baffle allows air into the A/C vent near the center of the cowl. This keeps the sound of the intake from going in a straight path to the A/C inlet.


I glued a velcro strip to the top of the baffle to seal it to the cowl. All around the edges I placed edge molding - closed cell foam and rubber (1/16" thick) which I applied using 3M #77 adhesive. I also put some Raammat on the cowl surfaces before I installed the cowl covers.


This is how the baffle sits in the cowl, looking down through the cowl.


I also applied gold heat reflecting tape to the intake to keep the radiant temperature down on the 2JR intake. You can also see the rain sock I placed over the air filter.


The cut out on the lower cowl cover that fits around the 2JR intake also has a split hose that is glued to the edge of the cutout. I glued it with 3M adhesive, and clamped the hose against the cutout with small clamps.


This really reduces the noise level in the interior of the ST.


Messages
191
Likes
76
Location
Columbia
#53
I finally got my baffle working properly, without it buzzing at low idle. I made a baffle which fits between the 2JR Intake and air filter/sock and the A/C Inlet. I took an aluminum sheet and cut and bent it so it provides a path for air to enter the inlet, but the baffle allows air into the A/C vent near the center of the cowl. This keeps the sound of the intake from going in a straight path to the A/C inlet.
Wow. Really nicely done.


westcoaST

1000 Post Club
Messages
1,157
Likes
290
Location
Corona
#54
Thanks tjd_tdi. The baffle really makes a difference in the sound level in the interior.


westcoaST

1000 Post Club
Messages
1,157
Likes
290
Location
Corona
#56
Any chance you made a template you could scan and post?
I made a cardboard template by measuring the height and length of the the cowl from the A/C vent to the center of the cowl, right next to the windshield wiper. I don't believe I saved it, though. I'll look and post it up if I find it.


Messages
237
Likes
103
Location
olathe
#57
Just a tip if you have issues routing the PCV hose, I found this elbow at a local AutoZone by chance and it said it fit Fords so took a chance on the fit.
I am using the hose I got from my Cobb intake still because I like it better than the one that came in the kit and it fits pretty well.

I found it online here too.
http://www.carid.com/dorman/pcv-elbow-mpn-46023.html?gclid=Cj0KEQjwx_WuBRDJ7tSK2-W0pJkBEiQAEWgR8FFsBqVc-qTaJJCWPyki3twyCMkTI-dJlW-o6E3KjdQaAqf68P8HAQ

IMG_1893.jpg

IMG_1894.jpg


Messages
38
Likes
3
Location
Brandon
#58
I Just placed a order for this intake and was wondering if I have to buy elbow from the turbo to the intake? And the screws from the maf sensor doesn't thread into the new intake system? Just trying to get a feel on what I all need. I did order the maf extension already from JMS.


westcoaST

1000 Post Club
Messages
1,157
Likes
290
Location
Corona
#59
I Just placed a order for this intake and was wondering if I have to buy elbow from the turbo to the intake? And the screws from the maf sensor doesn't thread into the new intake system? Just trying to get a feel on what I all need. I did order the maf extension already from JMS.
I had no problem screwing in the screws that hold the MAF down. You need to be careful when you install these screws you don't cross thread the holes in the MAF fitting on the tube. The kit comes complete with everything you need. You can pick up some elbows to make it easier to attach the hoses to the different bits you need to route to. Check out my build thread for what I used.


TyphoonFiST

9000 Post Club
Premium Account
Messages
11,513
Likes
8,007
Location
Rich-fizzield
#60
Where can you purchase the MAF pigtail extender? I'd like to be able to revert back to stock if ever needed.


Top