• Sign Up! To view all forums and unlock additional cool features

    Welcome to the #1 Focus RS Forum and Focus RS community dedicated to Focus RS owners and enthusiasts. Register for an account, it's free and it's easy, so don't hesitate to join the Focus RS Forum today!


Boomba Racing Catch Cans - Now Available with Intro Pricing!

Trader history for Boomba Racing (0)

Messages
15
Likes
3
#21
So I just received my stage 2 catch can and I realized it won't fit with my Injen intake.. The vacuum line on the Injen intake juts out further than stock and blocks any access for the oil can. Looks like a return is in order. [?|]
I guess I'll have to go with the Mishimoto can since it will be on the passenger side.
Also, note to Boomba, this may be worth mentioning in the product description to avoid any further confusion. [:)]


Messages
41
Likes
12
Location
Wheaton
#22
So I just received my stage 2 catch can and I realized it won't fit with my Injen intake.. The vacuum line on the Injen intake juts out further than stock and blocks any access for the oil can. Looks like a return is in order. [?|]
I guess I'll have to go with the Mishimoto can since it will be on the passenger side.
Also, note to Boomba, this may be worth mentioning in the product description to avoid any further confusion. [:)]
Wow! Thanks for this post backland. I have that intake and was considering the Boomba can. Based on this it looks like I will go Mishimoto as well.


OP
Boomba Racing

Boomba Racing

1000 Post Club
Messages
1,875
Likes
388
Location
Wood Dale
Thread Starter #24
So I just received my stage 2 catch can and I realized it won't fit with my Injen intake.. The vacuum line on the Injen intake juts out further than stock and blocks any access for the oil can. Looks like a return is in order. [?|]
I guess I'll have to go with the Mishimoto can since it will be on the passenger side.
Also, note to Boomba, this may be worth mentioning in the product description to avoid any further confusion. [:)]

We have actually tested these cans with many intakes and this shouldn't be an issue. The can sits in a clamp style bracket that is fully adjustable. You should be able to slide the can up or down in the bracket about 8" to raise or lower the can to the height desired simply by loosening one bolt on the side of the clamp bracket. The top of the can also spins independently from the body, allowing you to angle the inlets and outlets in any way you desire. Making this fit shouldn't be a problem. We recommend mounting it lower in the bracket and spinning the top so the inlet/outlet is facing opposite the vacuum line.

Wow! Thanks for this post backland. I have that intake and was considering the Boomba can. Based on this it looks like I will go Mishimoto as well.
Check out the post we made above this ^^

With the can and bracket being fully adjustable, this shouldn't be an issue. You can slide the can up or down within its bracket and you can also spin the inlet/outlet independently from the body to change the angle of them. We designed this piece to work with all types of intakes; both stock and aftermarket.

Just ordered mine in red..need to keep my valves so fresh & so clean.
#sofreshsoclean

Gotta keep it fresh!


Young L

Active member
Messages
524
Likes
88
Location
Richmond
#25
oh snap so you can spin the can around? my sight glass is toward the firewall, lol. I noticed the retaining ring on the top and thought maybe i could spin it but i just left it alone. I'll be checking the can every few thousand anyway so im not really worried.


OP
Boomba Racing

Boomba Racing

1000 Post Club
Messages
1,875
Likes
388
Location
Wood Dale
Thread Starter #26
oh snap so you can spin the can around? my sight glass is toward the firewall, lol. I noticed the retaining ring on the top and thought maybe i could spin it but i just left it alone. I'll be checking the can every few thousand anyway so im not really worried.
It may feel a little "stuck" at first, but yes; the top rotates independently of the whole assembly. Stick a screw driver or Allen key into an inlet or outlet and PUSH! This allows for endless combinations of hose routings and mounting locations.


Messages
326
Likes
50
Location
greensboro
#27
So I just received my stage 2 catch can and I realized it won't fit with my Injen intake.. The vacuum line on the Injen intake juts out further than stock and blocks any access for the oil can. Looks like a return is in order. [?|]
I guess I'll have to go with the Mishimoto can since it will be on the passenger side.
Also, note to Boomba, this may be worth mentioning in the product description to avoid any further confusion. [:)]

We have actually tested these cans with many intakes and this shouldn't be an issue. The can sits in a clamp style bracket that is fully adjustable. You should be able to slide the can up or down in the bracket about 8" to raise or lower the can to the height desired simply by loosening one bolt on the side of the clamp bracket. The top of the can also spins independently from the body, allowing you to angle the inlets and outlets in any way you desire. Making this fit shouldn't be a problem. We recommend mounting it lower in the bracket and spinning the top so the inlet/outlet is facing opposite the vacuum line.
Good info to know. Mines sitting in the box at home, haven't had the chance to install it yet.


OP
Boomba Racing

Boomba Racing

1000 Post Club
Messages
1,875
Likes
388
Location
Wood Dale
Thread Starter #28
In order to clear up some confusion about the top of the can and the inlet/outlets :

The top of the can is actually designed so that it can rotate independently of the body. All you have to do is take a screw driver or Allen key, place it in an inlet or outlet, and push. There may be a little resistance before it "breaks free", but once it does you can rotate the top of the can fully independently from the body.


Messages
175
Likes
32
Location
St. Paul
#29
In order to clear up some confusion about the top of the can and the inlet/outlets :

The top of the can is actually designed so that it can rotate independently of the body. All you have to do is take a screw driver or Allen key, place it in an inlet or outlet, and push. There may be a little resistance before it "breaks free", but once it does you can rotate the top of the can fully independently from the body.
[MENTION=1045]Boomba Racing[/MENTION].

Can you clear up the stuff about leaks in the fitting connections / people using other lines?


OP
Boomba Racing

Boomba Racing

1000 Post Club
Messages
1,875
Likes
388
Location
Wood Dale
Thread Starter #30
[MENTION=1045]Boomba Racing[/MENTION].

Can you clear up the stuff about leaks in the fitting connections / people using other lines?
Leaking in terms of what? So long as everything is installed properly, this kit should be air-tight and ready to fully install right out of the box.


Messages
175
Likes
32
Location
St. Paul
#31
Leaking in terms of what? So long as everything is installed properly, this kit should be air-tight and ready to fully install right out of the box.
I could have sworn I saw some people saying they were having leaking issues where the fittings were installed into the hose. There were also some people were having problems with non-factory hose collapsing. I can't seem to find the post. If this sounds familiar to anyone post us a link.


Messages
175
Likes
32
Location
St. Paul
#33
OP
Boomba Racing

Boomba Racing

1000 Post Club
Messages
1,875
Likes
388
Location
Wood Dale
Thread Starter #34
Messages
175
Likes
32
Location
St. Paul
#35
The leaking was due to the o-ring getting damaged in installation.

I think they are referring to the aftermarket clear hose that was put on collapsing; not the ones we provide. The hose we provide is rated to a very high PSI.
Thanks for the clarification!:)


Messages
326
Likes
50
Location
greensboro
#40
Repost from the other boomba catch can thread and from my build thread:

My Boomba Catch Can set-up. Sorry in advance for the crappy quality of the cell phone pics. For some reason mine didn't come with clamps so I had to buy some, no biggy as they are pretty cheap. I ended up getting some that could be tightened by hand so it would make removing the catch can easier later on when it needed to be drained. I also decided to go along with the 5/8 ID rubber hose to replace the OE plastic tube. I cut the OE connectors off right at the ribbed part of the tube and used a little oil to slip the rubber hose over it. The bolt on the intake manifold that needs to come off is an 8mm (I didn't see that listed anywhere in the install instructions) and can be a pain to get to unless you have extensions or a deep socket.

Picture of what came in the box


Upper part installed to the OE connector. The hoses supplied from boomba are long enough to reach to the OE connectors so I only needed a few inches of 5/8 ID rubber hose to adapt it to the connector.


Same for the bottom part (Intake side)


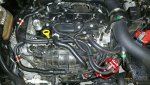
Finished, showing the routing of all of the hoses. I turned the whole catch can in the bracket and pushed it as low in the bracket as it would go to make it clear the hose coming off the ingen intake tube. I didn't feel comfortable forcing the top of the catch can to spin. I can still see the window on the catch can to see if it is full from the side.


All finished with the engine cover back on.


Similar threads


Top